Part of my ongoing journey through Bryan Krausen’s HashiCorp Vault for Absolute Beginners on Udemy. Today’s session covered one of the most fundamental — and most misunderstood — concepts in Vault: how it protects data at rest and what the seal/unseal process actually means in practice.
I ran through all three unseal methods in a home lab environment and got AWS KMS auto-unseal working on a local Vault server. Here is everything I learned.
How Vault Actually Protects Your Data
Before any seal or unseal conversation makes sense, it helps to understand what Vault is doing underneath.
When Vault stores a secret, it does not write it in plaintext. It encrypts it first using an encryption key. That encryption key is itself protected by a root key (sometimes called the master key). The root key never touches disk in usable form — it is either split into shards or encrypted by an external key management system.
The storage backend (in my case, Raft) holds only encrypted blobs. Even if someone gained direct access to the underlying storage, they would see nothing useful.
Here is the important part: when Vault starts up, it starts sealed. In the sealed state, Vault holds none of the keys in memory. It cannot read or write anything. It is essentially a locked box — running, but useless until it is deliberately unsealed.
Almost no operations are possible while Vault is sealed.
Vault Initialisation: A One-Time Event
Before unsealing can even happen, Vault must be initialised. This is a one-time operation that:
- Generates the root key
- Splits or wraps it according to the chosen seal type
- Creates the Initial Root Token
vault operator init
The Initial Root Token is the only authentication credential that exists at this point. It is the one key that can configure additional auth methods, set up audit logging, and establish policies. Once those are in place, best practice is to revoke the root token — you should not be running day-to-day operations with it.
Guard the root token and recovery/unseal keys carefully. Once lost, they cannot be recovered.
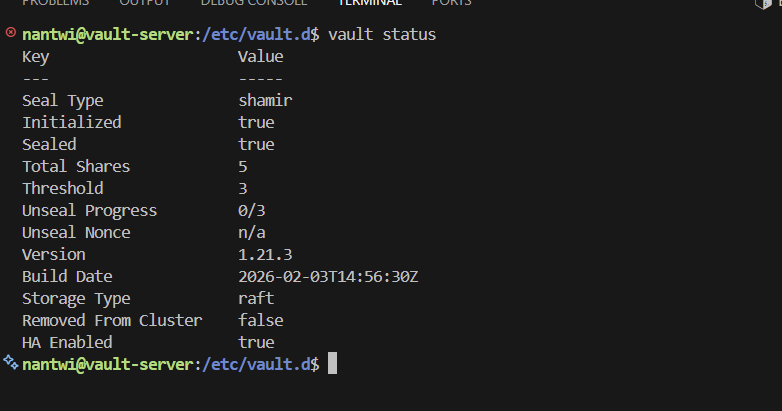
After initialisation, I ran vault status and confirmed the default configuration:
- Seal Type: Shamir
- Total Shares: 5
- Threshold: 3
- Storage: Raft
The Three Unseal Options
Vault supports three approaches to unsealing. Each one answers the same fundamental question differently: how do we get the root key back into memory safely when Vault starts?
1. Shamir’s Key Sharing (Default)
Vault generates the root key and immediately splits it into multiple key shards using Shamir’s Secret Sharing. These shards are distributed to trusted people in the organisation. No single person holds all the shards. To unseal, a minimum number of keyholders (the threshold) must each provide their shard in sequence.
With the default 5-of-3 setup:
- 5 shards are distributed to 5 different people
- Any 3 of those 5 can collectively unseal the vault
- No individual can unseal alone
Key management practices:
- Never let one person hold all shards
- Store each shard separately — ideally across different employees, locations, or secure storage systems
- Encrypt shards during initialisation using PGP so even a shard holder cannot read it without their private key
- Rotate keys regularly using
vault operator rekey
2. Auto-Unseal (Cloud KMS / On-Prem HSM)
Instead of splitting the root key into shards, Auto-Unseal encrypts the root key using an external key management system — AWS KMS, Azure Key Vault, GCP Cloud KMS, or an on-premises HSM.
When Vault starts, it automatically contacts the KMS, decrypts the root key, loads it into memory, and unseals — no human intervention required. This is ideal for production environments and automated deployments where waiting for three keyholders to log in is not practical.
With Auto-Unseal, the credentials generated during initialisation are called recovery keys, not unseal keys. Recovery keys serve a different purpose — they are used for specific emergency scenarios:
- Recovering access after losing the storage backend
- Disaster recovery when KMS access is permanently lost
They are not used for routine unsealing.
3. Transit Auto-Unseal
Transit Auto-Unseal works like cloud Auto-Unseal but without relying on an external cloud provider. Instead, you deploy a second Vault cluster, enable the Transit Secrets Engine on it, and use that cluster as the key management system for your primary cluster.
This is the right choice when:
- You are running fully on-premises
- You cannot or do not want to use internet-exposed services like AWS KMS
- You need the automation of Auto-Unseal with infrastructure you control entirely
Lab: Unsealing with Shamir Key Shards
The command to unseal Vault is:
vault operator unseal
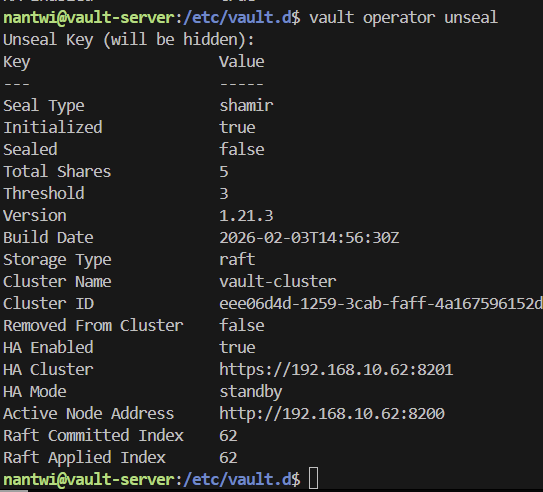
Run it once per key shard. Vault will prompt for each one and track progress toward the threshold. Once the threshold is met, Vault automatically transitions to the unsealed state.
After providing 3 of my 5 key shards, vault status showed Sealed: false:
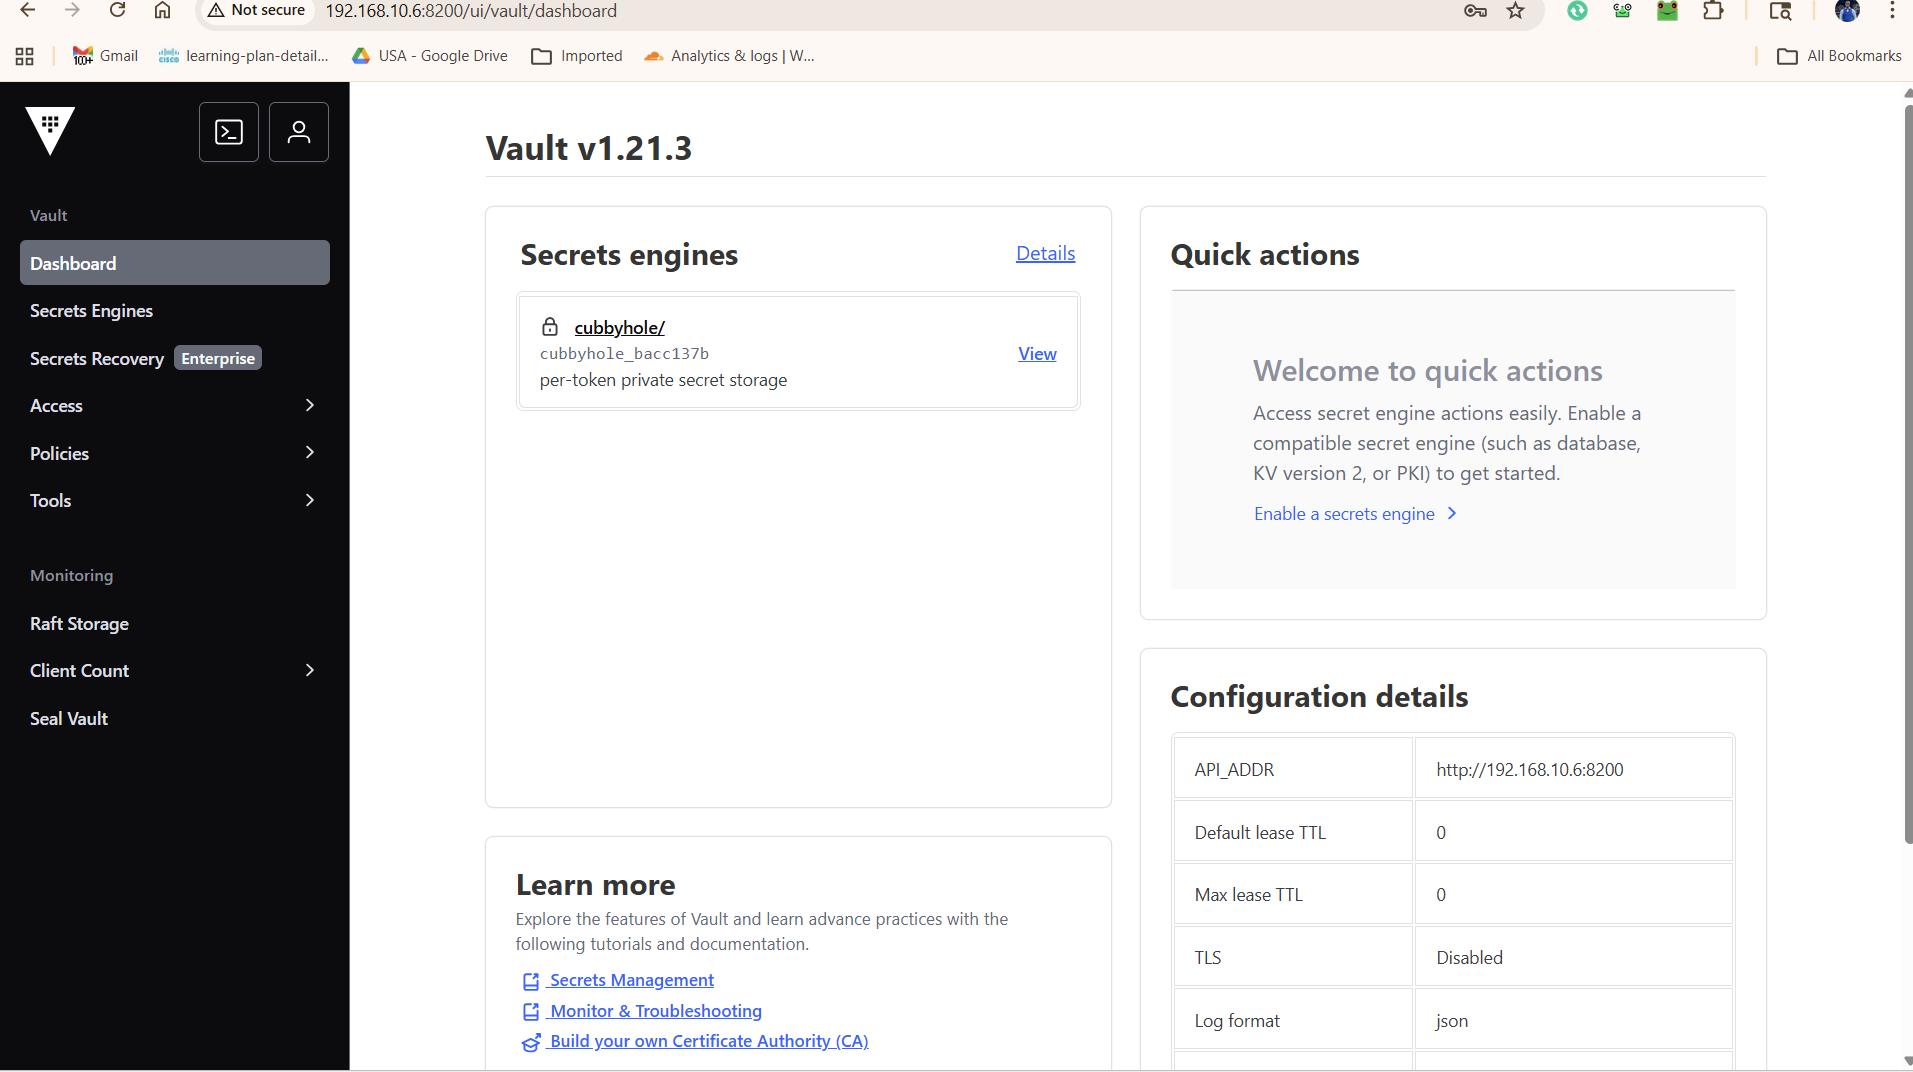
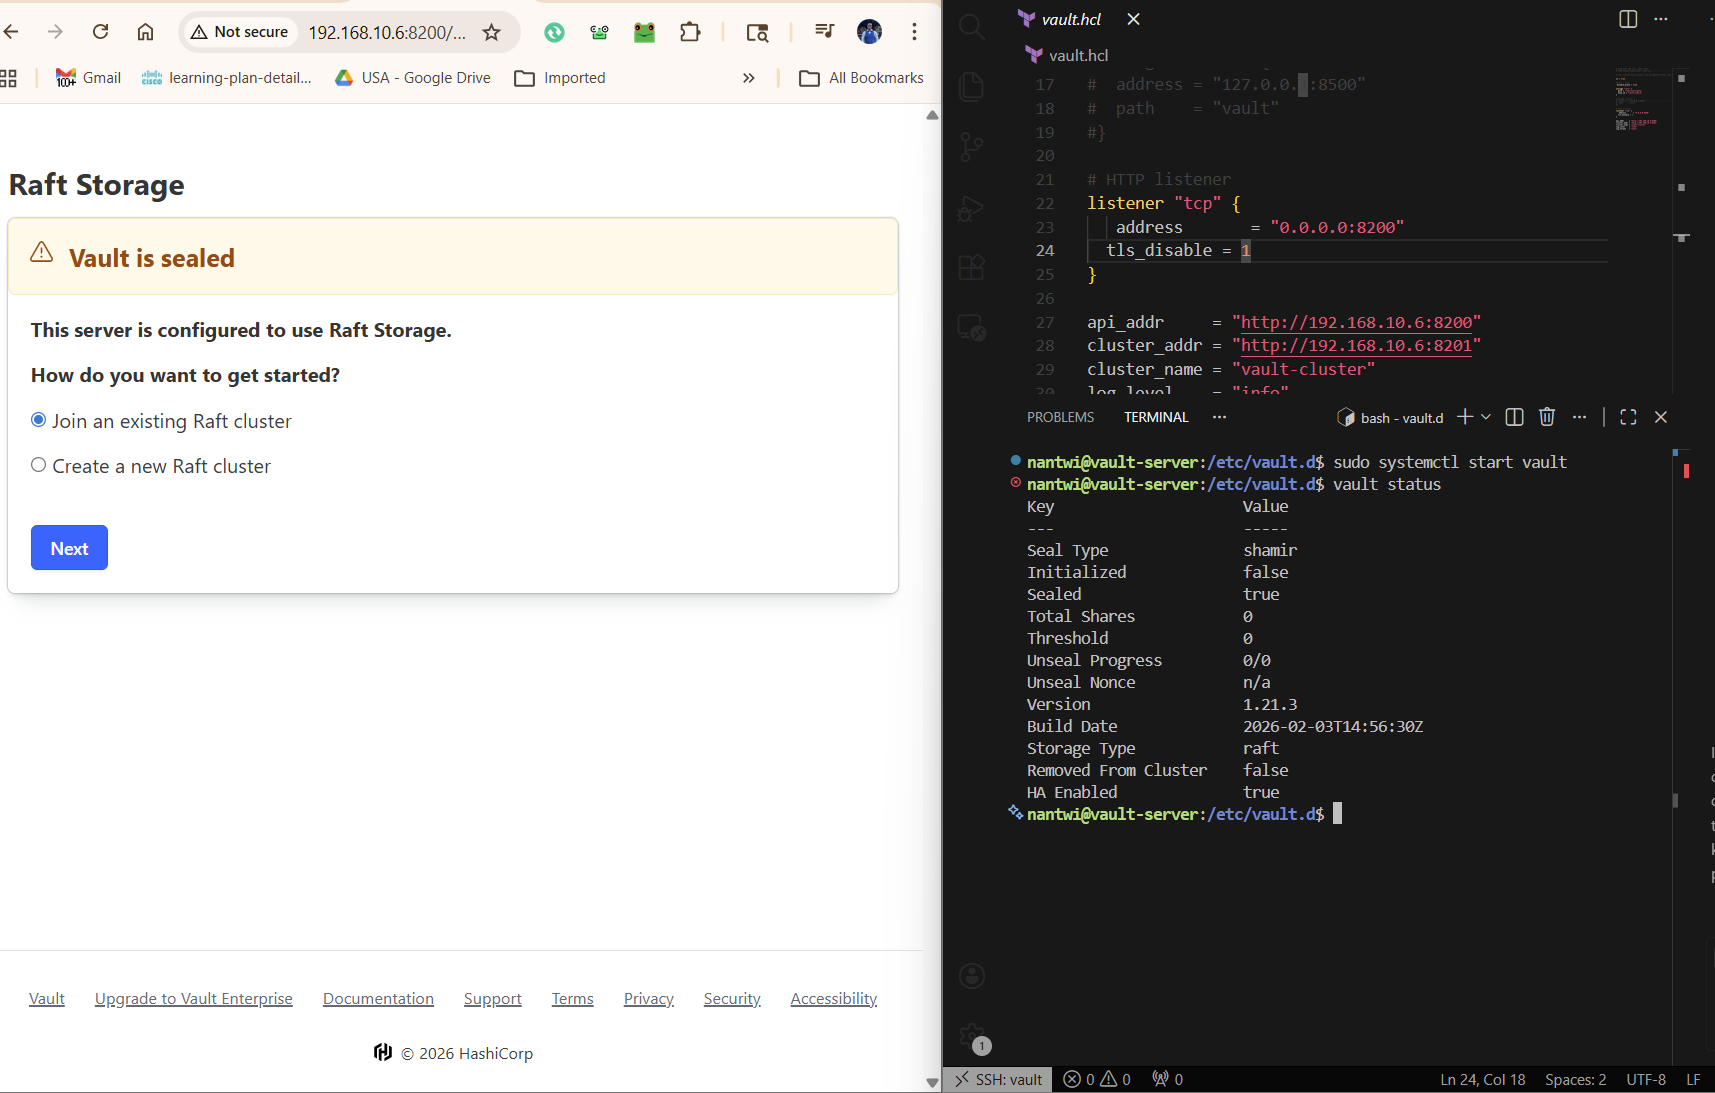
The Vault UI login page became accessible at this point:
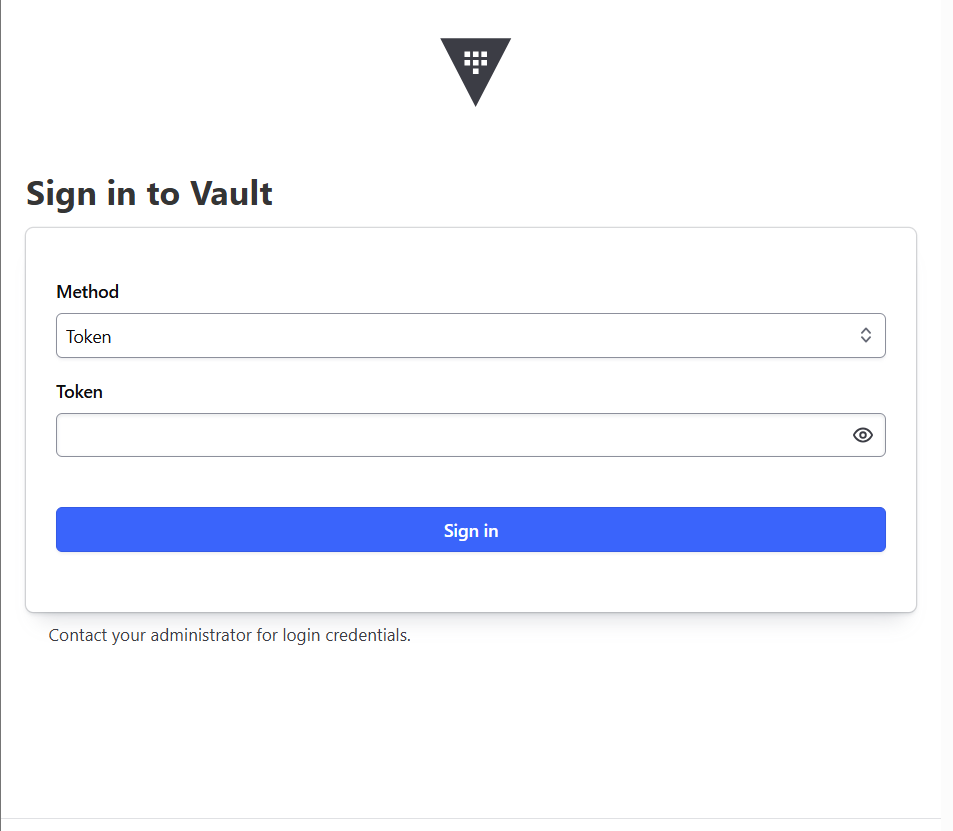
To log in, I used the Initial Root Token — either via CLI:
vault login
Or directly in the GUI:
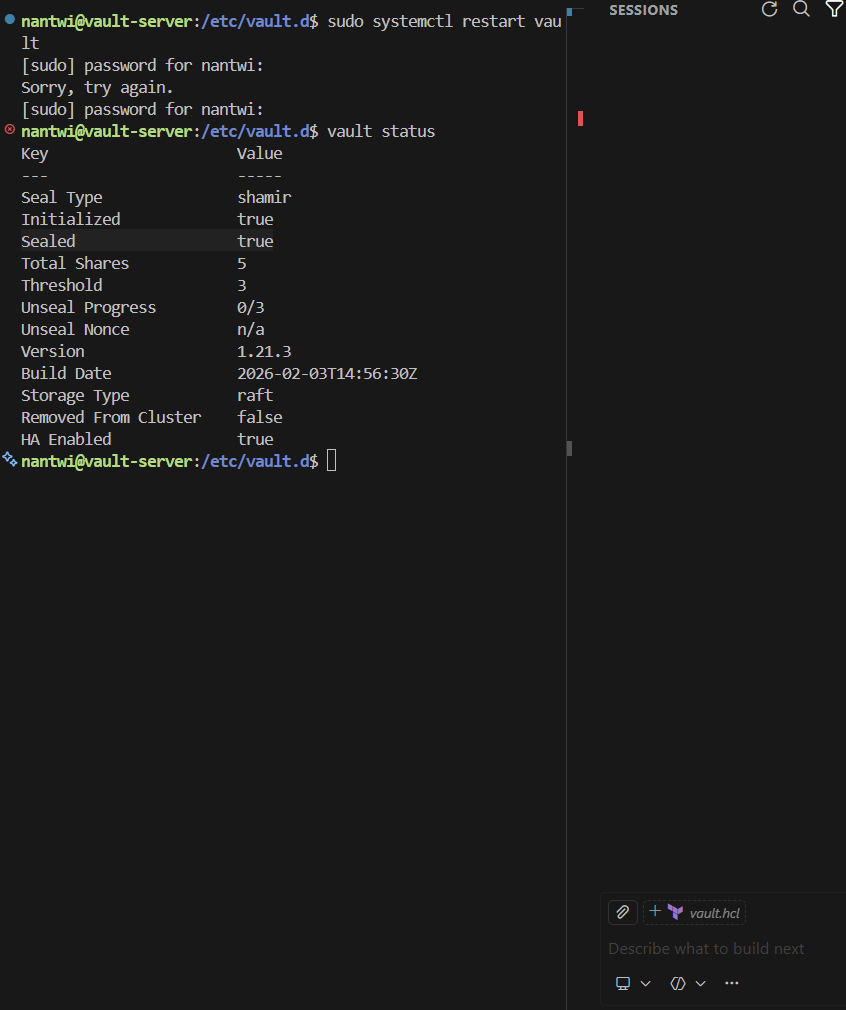
Important: Every time the Vault service restarts with Shamir unsealing, it returns to the sealed state. You must go through the unseal process again before Vault becomes usable. This is intentional — it ensures secrets are never accessible without deliberate human action after a restart.
This behaviour is clearly visible after a restart:
Lab: Resetting Vault to a Clean State
Before switching to AWS KMS Auto-Unseal, I needed to wipe the existing Vault data and start fresh. On my Raft-backed setup, that meant removing the Raft data directory and the database file, then restarting:
sudo rm -rf /opt/vault/data/raft
sudo rm -f /opt/vault/data/vault.db
sudo systemctl start vault
This gives you a completely uninitialised Vault instance, as if it were brand new.
Lab: Configuring AWS KMS Auto-Unseal
This was the most involved part of the session. The goal: configure my on-premises Vault server to automatically unseal itself using an AWS KMS key every time the service starts.
Step 1: Create a KMS Key in AWS
In AWS Console → KMS → us-east-1, I created a new symmetric key (Encrypt/Decrypt type). During setup, I assigned iamadmin as both the key administrator and key user.
The key policy grants the following IAM actions — these are the minimum permissions Vault needs:
{
  "Effect": "Allow",
  "Action": [
    "kms:Encrypt",
    "kms:Decrypt",
    "kms:DescribeKey"
  ],
  "Resource": "*"
}
I noted the Key ARN for use in the Vault configuration.
Step 2: Update the Vault Configuration File
I added a seal block to /etc/vault.d/vault.hcl:
seal "awskms" {
  region     = "us-east-1"
  kms_key_id = "arn:aws:kms:us-east-1:625439398171:key/bfd143ad-76b6-4f04-90bf-8cdcf4e40311"
}
Step 3: Store AWS Credentials Securely
Rather than hardcoding credentials inside the HCL file (which could be accidentally committed or exposed), I stored them in /etc/vault.d/vault.env:
AWS_ACCESS_KEY_ID=<access-key-id>
AWS_SECRET_ACCESS_KEY=<secret-access-key>
The Vault systemd unit file references this via EnvironmentFile=/etc/vault.d/vault.env, so Vault picks up the credentials automatically on start without them ever appearing in the main config.
I locked down file permissions to ensure only root and the vault service account could read the credentials:
sudo chmod 640 /etc/vault.d/vault.env
sudo chown root:vault /etc/vault.d/vault.env
Step 4: Initialise with Recovery Keys
Since Vault was starting fresh with KMS auto-unseal, I initialised using recovery keys instead of unseal keys:
vault operator init -recovery-shares=5 -recovery-threshold=3
vault status now confirmed KMS auto-unseal was active:
Seal Type       awskms
Sealed          false
Initialized     true
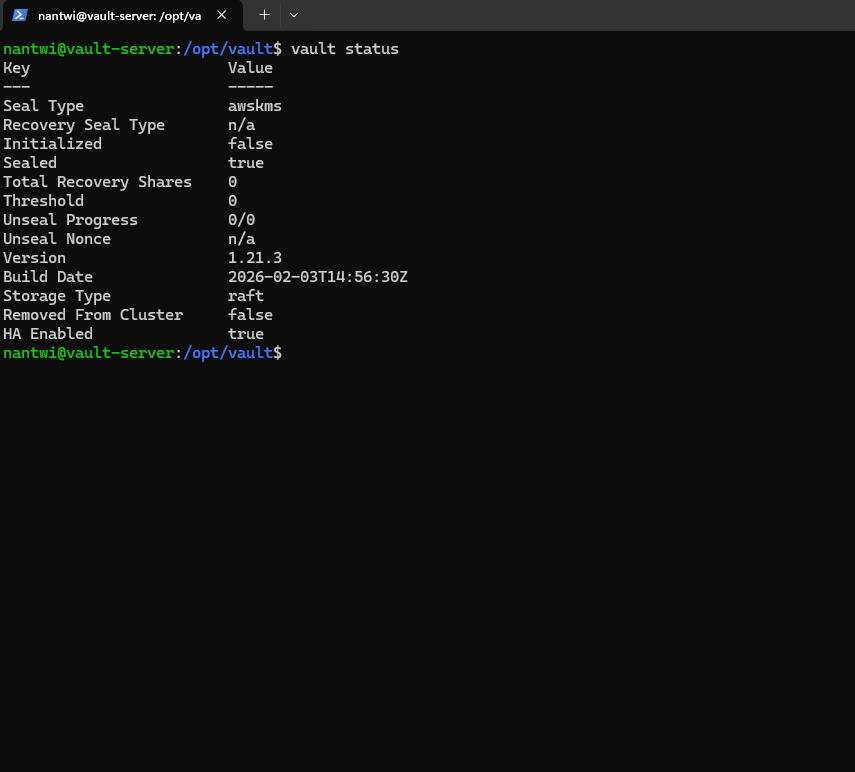
Vault generated recovery keys rather than unseal keys:

From this point on, every time the Vault service restarts, it contacts AWS KMS, decrypts the root key, and unseals automatically — no manual intervention required.
Recovery Keys vs Unseal Keys: A Quick Summary
| Unseal Keys (Shamir) | Recovery Keys (Auto-Unseal) | |
|---|---|---|
| Used for | Routine unsealing after restart | Emergency / disaster recovery only |
| Human required on restart? | Yes — threshold must be met | No — KMS handles it automatically |
| Number generated | Configurable (default: 5/3) | Configurable (default: 5/3) |
| When KMS is unavailable | N/A | Recovery keys used to regain access |
Seal as a Break-Glass Mechanism
One thing worth highlighting: the vault operator seal command exists precisely for incident response.
If you detect suspicious activity or a potential breach:
vault operator seal
All access to secrets stops immediately. Vault returns to the sealed state. No one can read or write anything until the vault is deliberately unsealed again. It is one of the most powerful security controls available — a clean, immediate off-switch for all secret access.
What’s Next
The next areas I want to explore:
- Vault Policies — how access control is defined using HCL policy documents
- Auth Methods — configuring AppRole, AWS IAM auth, and others beyond the root token
- Dynamic Secrets — generating short-lived AWS IAM credentials on demand, directly from Vault
This course is building a solid mental model of how secrets management works in practice. Highly recommended for anyone working in DevOps, cloud security, or infrastructure roles.