This post documents a specific milestone in my enterprise homelab build: moving the Proxmox VE hypervisor from a VLAN 10 access port onto a trunk port, enabling it to host virtual machines across any VLAN in the lab, not just Management.
It is one of those changes that sounds straightforward but has one critical sequence requirement that, if you get wrong, will lock you out of the machine entirely. I will walk through the full process, the reasoning behind each step, and what the output looks like at every stage.
Background: The Lab Network
My homelab runs pfSense as the core firewall and router, with a TP-Link TL-SG108E managed switch providing VLAN segmentation across six network segments:
| VLAN | Name | Subnet |
|---|---|---|
| 10 | Management | 192.168.10.0/24 |
| 20 | BlueTeam | 192.168.20.0/24 |
| 30 | RedTeam | 192.168.30.0/24 |
| 40 | DevOps | 192.168.40.0/24 |
| 50 | EnterpriseLAN | 192.168.50.0/24 |
| 60 | Monitoring | 192.168.60.0/24 |
The switch has two trunk ports carrying all VLANs tagged: Port 1 goes to pfSense, and Port 2 was previously used for the primary laptop. The remaining ports are access ports, each belonging to a single VLAN.
I installed Proxmox VE on a dedicated desktop machine and initially connected it to Port 3 (a VLAN 10 access port) to complete the installation and get the management IP assigned. That works fine for setup, but it means every VM on that Proxmox node is stuck on VLAN 10. To deploy Kali Linux on VLAN 30 (RedTeam), or any VM on a different network segment, Proxmox needs to be on a trunk port.
The goal: move Proxmox from Port 3 (VLAN 10 access) to Port 2 (trunk, all VLANs) without losing connectivity in the process.
Understanding the Problem First
This is where most guides skip a step that matters. Here is what actually changes when you move from an access port to a trunk port:
On an access port, the switch delivers VLAN 10 frames to Proxmox completely untagged. Proxmox does not need to know anything about VLANs. It just sees a normal Ethernet frame and responds accordingly.
On a trunk port, the switch delivers all VLAN traffic with 802.1Q tags attached. A VLAN 10 frame arrives with a VLAN 10 tag embedded in the Ethernet header. If Proxmox’s network bridge is not configured to understand and strip those tags, it cannot process the frames, and the management IP becomes unreachable the moment the cable moves.
So the correct sequence is non-negotiable:
1. Reconfigure Proxmox networking to be VLAN-aware  <- while still on the access port
2. Verify the new config is correct
3. Then move the cable to the trunk port
Doing it in any other order means you cut your own access before the fix is in place.
Step 1: Identify the NIC Name
SSH into Proxmox while still on Port 3:
ip link show
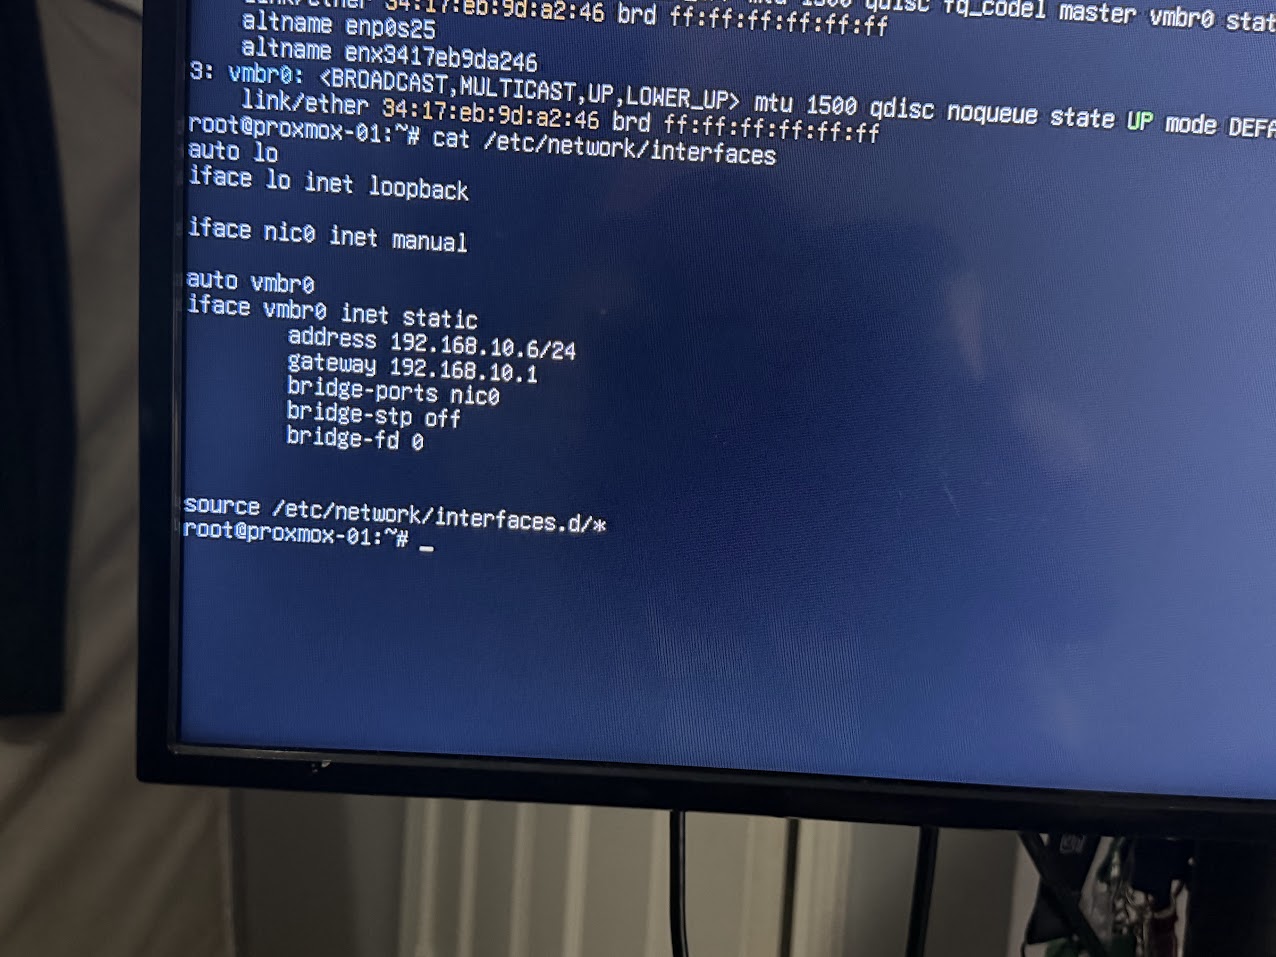 Output of ip link show. The physical NIC name is required before editing any config.
The physical NIC on this machine is named nic0, with alternative names enp0s25 and enx3417eb9da246. The name that matters is whichever one Proxmox is already using in /etc/network/interfaces. I checked that next:
cat /etc/network/interfaces
The existing config confirmed nic0 as the bridge port in the default vmbr0 configuration. Critically, it showed that the management IP 192.168.10.6 was sitting directly on vmbr0 with no VLAN tag. That is the standard post-install state and exactly what needs to change.
Step 2: Understanding the Default Config
Out of the box, a fresh Proxmox installation creates a config that looks roughly like this:
iface nic0 inet manual

auto vmbr0
iface vmbr0 inet static
        address 192.168.10.6/24
        gateway 192.168.10.1
        bridge-ports nic0
        bridge-stp off
        bridge-fd 0
The management IP lives directly on vmbr0, which is a flat bridge with no VLAN awareness. This works fine when the port is untagged. It fails completely on a trunk port because vmbr0 has no mechanism to decode the VLAN 10 tag that arrives on trunk traffic.
The change required is:
- Add
bridge-vlan-aware yesandbridge-vids 2-4094tovmbr0, making it trunk-capable - Remove the IP address from
vmbr0. It should carry no IP of its own - Create a new sub-interface
vmbr0.10and assign the management IP there. This interface explicitly handles VLAN 10 tagged traffic
Step 3: Back Up and Edit the Config
Before changing anything:
cp /etc/network/interfaces /etc/network/interfaces.backup
nano /etc/network/interfaces
The new configuration, replacing the entire file contents:
auto lo
iface lo inet loopback

# Physical NIC - no IP, pure trunk carrier
auto nic0
iface nic0 inet manual

# VLAN-aware bridge - handles all VLANs through single physical NIC
auto vmbr0
iface vmbr0 inet manual
        bridge-ports nic0
        bridge-stp off
        bridge-fd 0
        bridge-vlan-aware yes
        bridge-vids 2-4094

# VLAN 10 sub-interface - Proxmox management IP lives here
# This survives the trunk port because it explicitly tags VLAN 10
auto vmbr0.10
iface vmbr0.10 inet static
        address 192.168.10.6/24
        gateway 192.168.10.1
        dns-nameservers 192.168.10.1

source /etc/network/interfaces.d/*
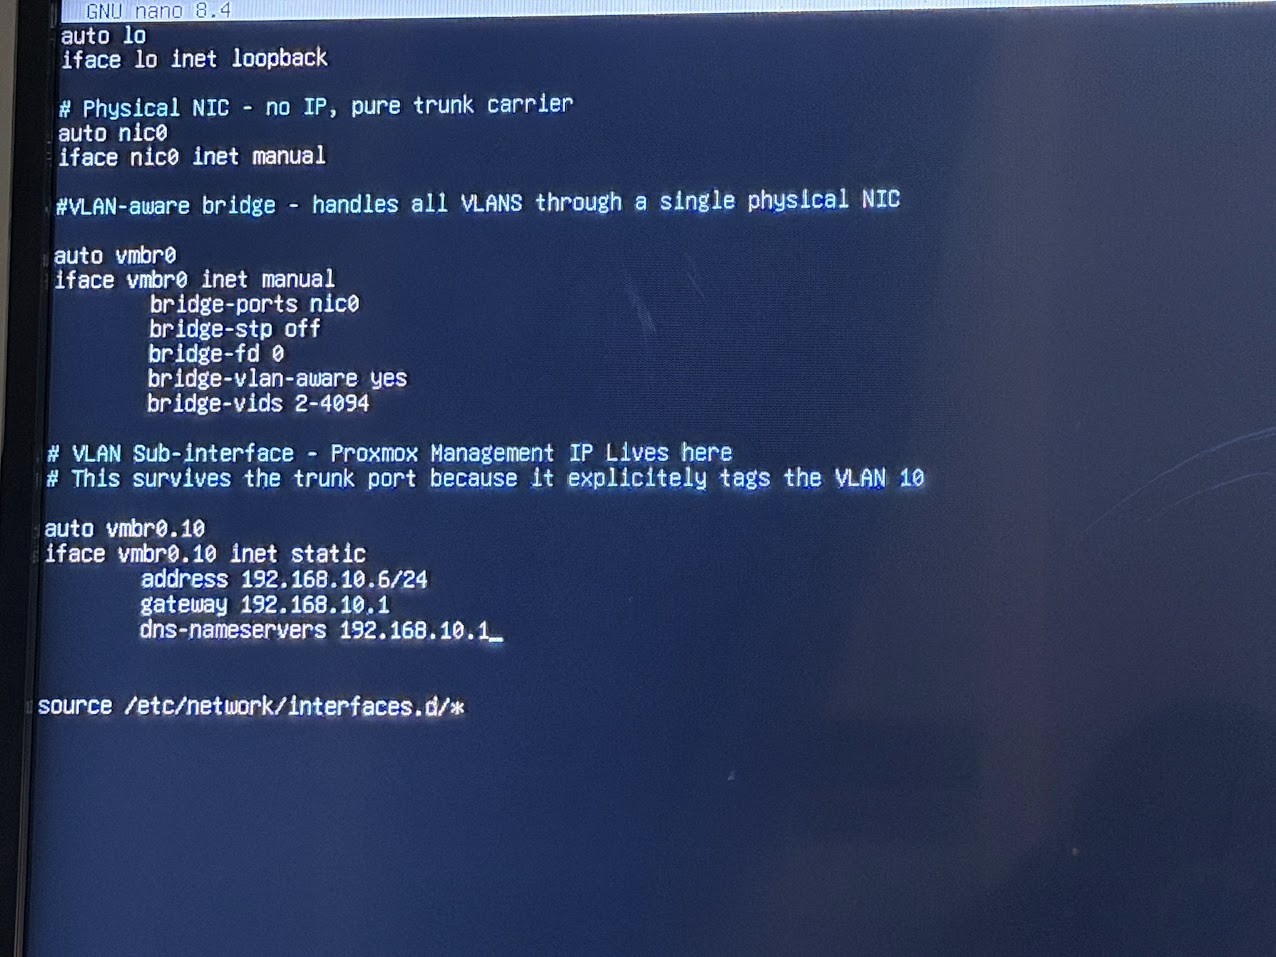 The updated interfaces file in nano. vmbr0 is now VLAN-aware and the management IP has moved to vmbr0.10.
The key changes from the default:
vmbr0is nowinet manualwith no IP address. It is a VLAN carrier, not a management interfacebridge-vlan-aware yesenables 802.1Q processing on the bridgebridge-vids 2-4094tells the bridge to accept any VLAN tag in that rangevmbr0.10is the new management interface. It explicitly handles traffic tagged VLAN 10
Step 4: Apply and Verify Before Moving the Cable
Proxmox uses ifupdown2, which allows network configuration changes to be applied without a reboot:
ifreload -a
After waiting approximately ten seconds for the interfaces to reinitialise, I ran the verification checks:
# Confirm management IP is on the VLAN sub-interface
ip addr show vmbr0.10

# Confirm VLAN filtering is active on the bridge
cat /sys/class/net/vmbr0/bridge/vlan_filtering

# Confirm routing table still points to pfSense
ip route

# Ping pfSense
ping -c 4 192.168.10.1
 Verification output after ifreload. vmbr0.10 has the correct IP, vlan_filtering returns 1, and the route is correct.
The ping to pfSense returned Destination Host Unreachable at this stage, and that is the expected behaviour. The config is now sending tagged VLAN 10 frames, but Port 3 on the switch is an access port that only accepts untagged frames. The switch drops them. This confirms the new config is working correctly. It just needs to be on a trunk port to complete the handshake.
The three checks that matter all passed:
vmbr0.10shows192.168.10.6/24vlan_filteringreturns1- Default route points to
192.168.10.1viavmbr0.10
Step 5: Move the Cable to the Trunk Port
With the configuration verified, I moved the Ethernet cable from Port 3 to Port 2 on the TP-Link switch and ran the ping again immediately:
ping -c 4 192.168.10.1
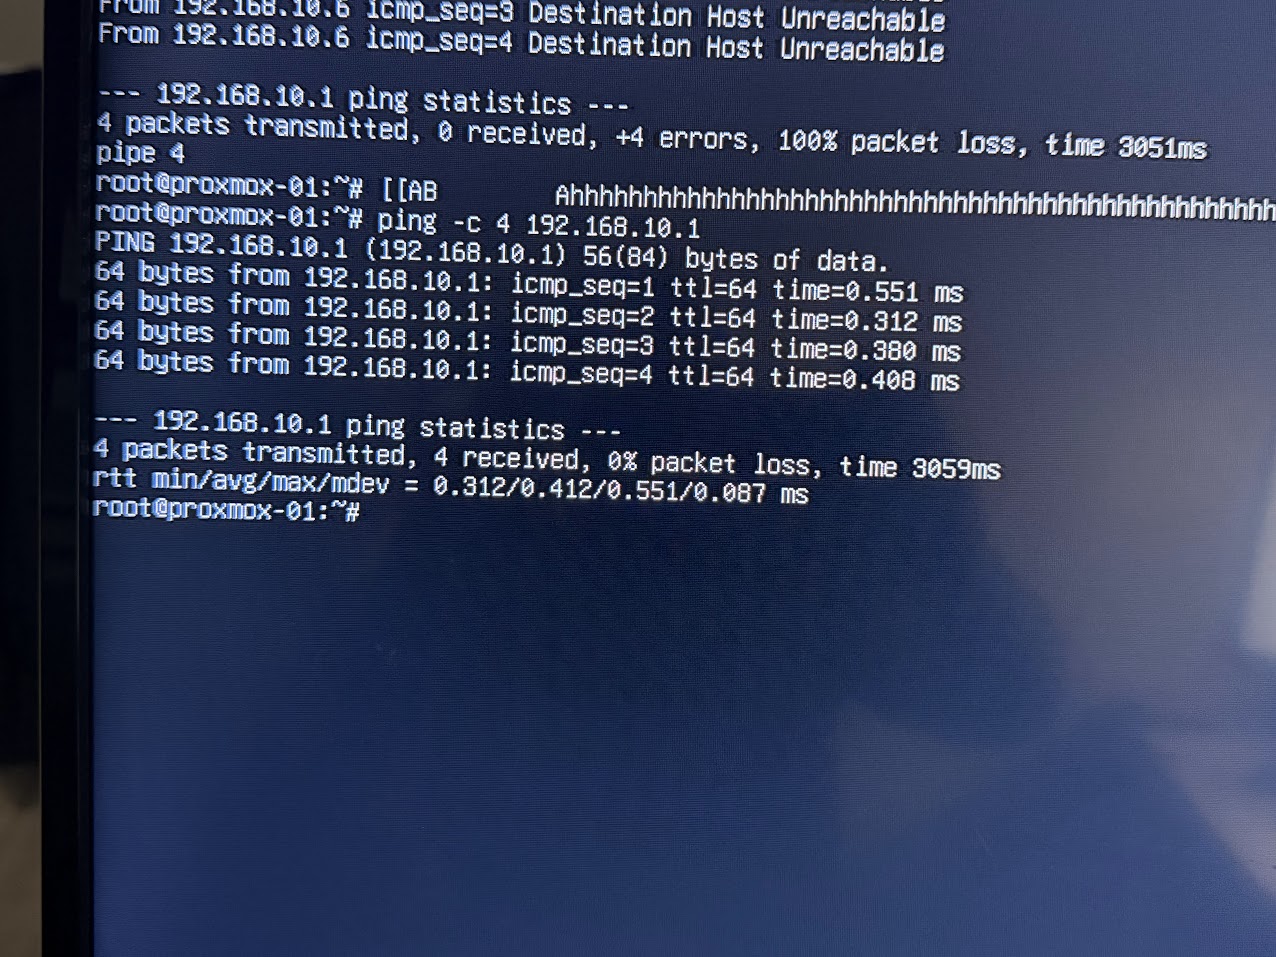 4 packets transmitted, 4 received, 0% packet loss. Proxmox is live on the trunk port.
4 packets transmitted, 4 received, 0% packet loss
rtt min/avg/max/mdev = 0.312/0.412/0.551/0.087 ms
The sub-millisecond response time confirms a clean Layer 2 connection to pfSense on the same physical switch. VLAN 10 tagging is working correctly end to end.
Step 6: Confirm the Web UI
Proxmox’s web interface is accessible from the management network:
https://192.168.10.6:8006
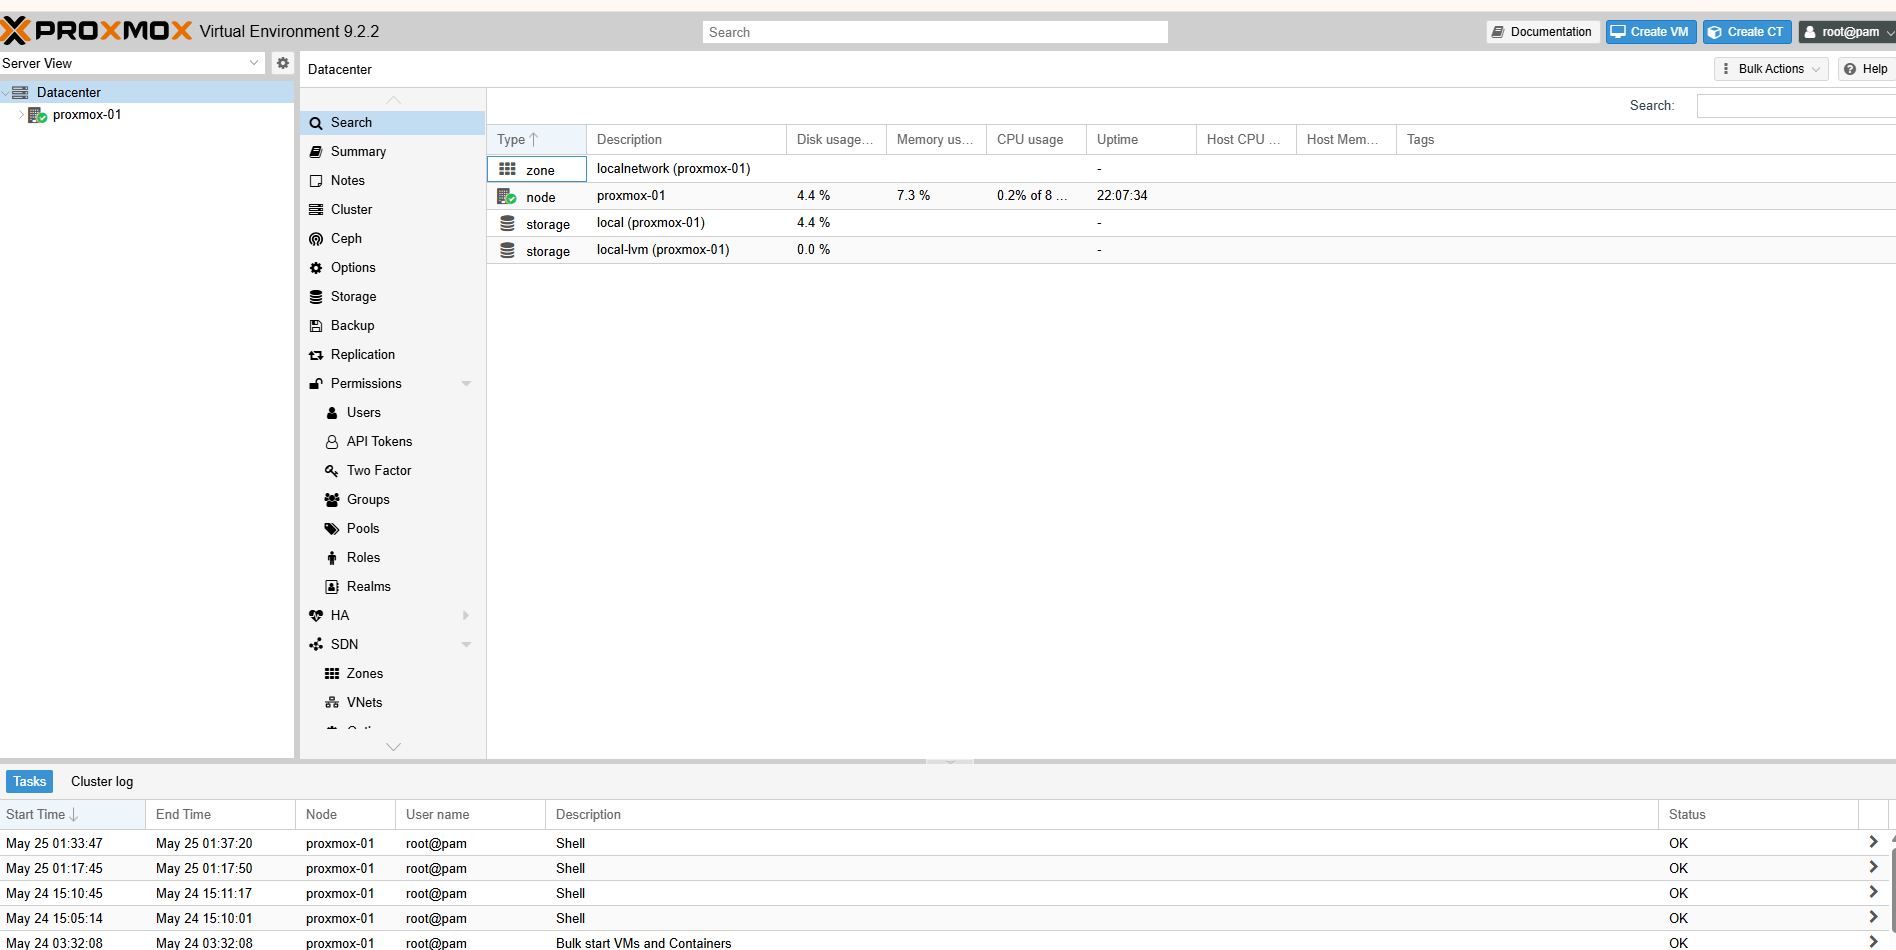 Proxmox VE web UI accessible at 192.168.10.6:8006 from the management network.
The “No valid subscription” notice that appears on login is standard for the free community edition and does not affect functionality. Clicking OK dismisses it.
Navigating to Datacenter -> proxmox -> System -> Network confirms the final interface state:
| Interface | Type | Configuration |
|---|---|---|
nic0 |
NIC | No IP, trunk carrier |
vmbr0 |
Linux Bridge | VLAN-aware, bridge-vids 2-4094 |
vmbr0.10 |
VLAN Interface | 192.168.10.6/24, management |
How VM VLAN Assignment Works Going Forward
With vmbr0 now VLAN-aware and on a trunk port, placing a VM on any VLAN is a single field in the VM creation wizard:
- Bridge:
vmbr0 - VLAN Tag: the VLAN ID you want
For example, a Kali Linux VM destined for the RedTeam network:
Bridge:    vmbr0
VLAN Tag:  30
Kali boots, requests a DHCP lease, and pfSense responds with an address from the 192.168.30.0/24 pool, the same pool it manages for VLAN 30 across the rest of the lab. No additional pfSense configuration is required because the VLAN already exists and pfSense is already the DHCP server for it.
The same applies to any VLAN in the lab. Every VM gets its network assignment from a single VLAN Tag field, and vmbr0 handles the 802.1Q tagging transparently.
Updated Infrastructure State
Every system in this lab runs on dedicated bare-metal hardware. Proxmox is the hypervisor layer added on top of that physical foundation, enabling VM workloads across any VLAN without requiring additional physical machines.
| System | IP | VLAN | Deployment | Purpose |
|---|---|---|---|---|
| pfSense | 192.168.10.1 | Management | Dedicated machine | Gateway and firewall |
| Ansible Controller | 192.168.10.2 | Management | Dedicated machine | Automation |
| Laptop | 192.168.10.3 | Management | Dedicated machine | Admin workstation |
| TCM Ubuntu | 192.168.10.4 | Management | Dedicated machine | Training |
| Windows Server 2022 | 192.168.10.5 | Management | Dedicated machine | Enterprise services |
| Proxmox VE | 192.168.10.6 | Management | Dedicated desktop | VM hypervisor |
| Wazuh SIEM | 192.168.20.2 | BlueTeam | Dedicated machine | SIEM |
| HashiCorp Vault | 192.168.40.x | DevOps | Dedicated machine | Secrets management |
| Grafana | 192.168.60.2 | Monitoring | Dedicated machine | Observability |
Key Takeaways
The configuration change itself is small: four lines added to /etc/network/interfaces and the management IP moved one level down to a VLAN sub-interface. The important part is understanding why the sequence matters.
Moving the cable before reconfiguring the bridge means Proxmox receives tagged frames it cannot decode, and the management IP vanishes. Reconfiguring first means the bridge is ready to speak trunk before the trunk port is introduced. The verification step between config change and cable move is what makes this safe to do without physical console access.
A single VLAN-aware bridge on a single NIC now gives every VM on this Proxmox node access to any of the six lab VLANs, the same capability that previously required separate NICs or separate physical connections.
Part of the ongoing Enterprise Information Security Lab build documentation.